Kurs:Photoshop Einzellösungen/en/Vertical Stitching of Geometrically Clearly Defined Objects
This course addresses beginners. The editing steps are kept simple on purpose.
Initial Situation
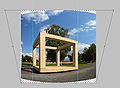
BearbeitenCertain circumstances do not allow you to photograph an object from the necessary distance and so you take several photos slightly staggered:


The slightly different lighting situations can be ignored for now. It's clearly visible that the vertical lines significantly differ. But this is not a problem.
Automated Stiching
BearbeitenFile -> Automate -> Photomerge...
Layout stays set to Auto, set check mark to
- Vignette Removal
- Geometric Distortion Correction
and than click ok, result:

Amend Compilation
Bearbeiten- Use
<Ctrl>+<E>to reduce the 4 single layers to one layer - Use
<Ctrl>+<Shift>+<L>for auto color correction (Auto Levels) - Use
Edit -> Transform -> Distortto correct the perspective distortion - the full image is cutted out along the visible borderlines
- Use
Edit -> Transform -> Warpto adjust the horizontal lines
-
 Use guides to adjust the vertical lines correctly
 -
 distort upwards, the object would be too wide
 -
 the horizontals are adjusted by eye


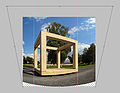
Final Result
Bearbeiten
Not optimal but usable. The path and the bottom edge are still crooked and could be corrected - but not necessarily need to be.